Since moving to a new house and garden two years ago, I didn´t find time to blog. I intend to reviwe the danish version, and guess there will be a convenient translation option. I also intend to let wild fermentation become a major subject in my blog.
November 6, 2016
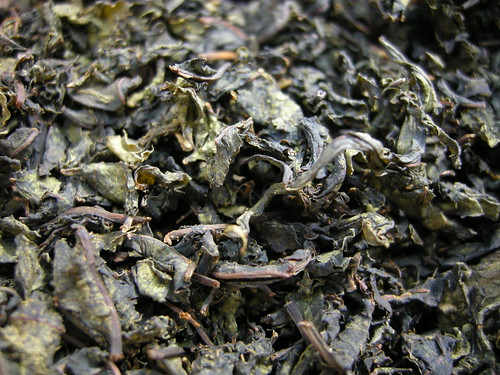
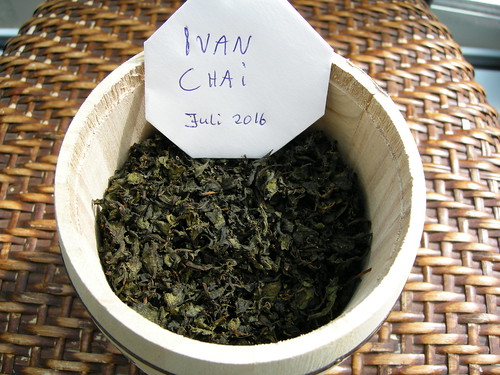
Ready homemade Ivan chai
In Russia, rosebay willowherb (fireweed) leaves are fermented in to a lovely tea. It is an old tradition, and before chinese tea was readily available in Europe, Russia exported huge amounts of Ivan Chai to western Europe. In russian it is known as Koporskij chai (Копорский чай) or Ivan chai (иван-чай), but Ivan chai is also the russian name for rosebay willowherb, as found growing in the wood. Leaves are picked both before and during flowering.
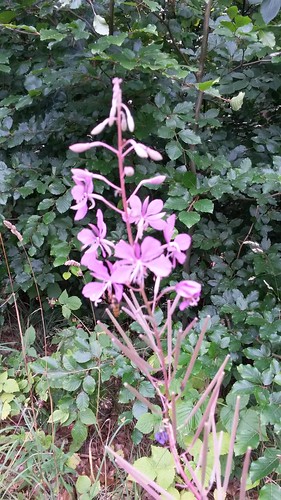
Rosebay willowherb, Chamerion angustifolium
Rosebay willowherb often grow in large groups in clearings in the forest or wood. It is quite common in my area. You can start to harvest as soon as you recognize the plants, and you can continue during flowering until seeds are formed. Seed fluff in your tea is not pleasant.
A harvest tip: Grab the stem below the inflorescence. With the other hand slide down the stem, collecting all the leaves while doing so. This way you can harvest what you need for a year in an instant.
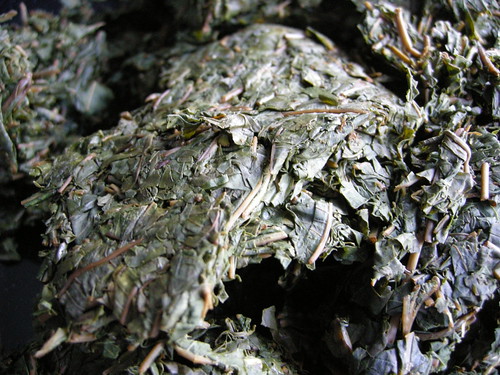
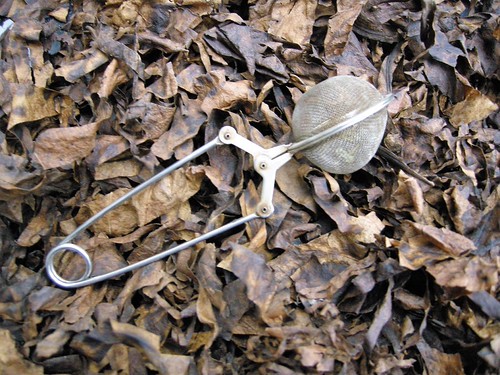
The fermented leaves prior to drying
The leaves must undergo a fermentation process to bring out the good flavor. The flowers can be dried without fermentation and mixed in as decoration.
Russia is a huge country, and similarly there are many opinions on how best to ferment and dry Ivan chai.
I chose to squeeze the leaves until the got soggy from their own juice, tucked them firmly in a polythene bag and let them ferment for two days. I’m using longer fermentation than russian sources prescribe, as my summer temperatures are considerably lower, and I don’t want to use artificial heating during the fermentation process.
After fermentation I cut the leaves into narrow strips and dry them.
Ivan chai after drying
Preparing the tea for drinking, I use about double of black chinese tea. But then I can prepare a nice tea two to three times from the same Ivan chai leaves, before the taste deteriorates.
The taste is lovely, a bit like a cross between black and green Chinese tea. Contrary to Chinese tea, Ivan Chai is slightly sedative.
February 4, 2016
 //embedr.flickr.com/assets/client-code.js
Processed Mongolian tea ready to store
Mongolian tea is naturally, on plant, fermented leaves of Bergenia crassifolia (syn. Bergenia cordifolia). It is used in Mongolia and Siberia, where Bergenia crassifolia grows in the wild. The leaves are collected when the snow melts in the spring.
 //embedr.flickr.com/assets/client-code.js
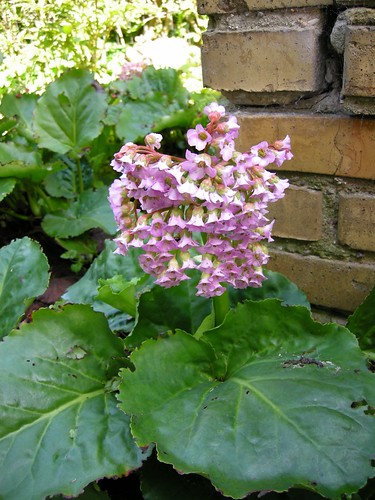
Bergenia crassifolia, flowers in may
Bergenia crassifolia is quite a common perennial in older european gardens. It is green all winter. My Bergenia crassifolia comes from my grandparents’ cottage garden. They had a large bed with it, and my mother could remember the plants from before 1930. The bed is still there – the cottage replaced with a modern comfortable house.
 //embedr.flickr.com/assets/client-code.js
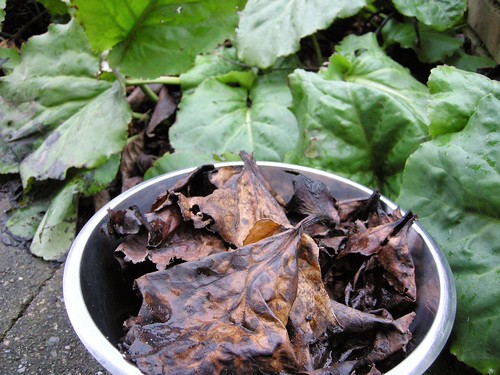
The withered brown leaves harvested in winter
In Siberia and Mongolia is not unusual to drink mongolian tea. I can remember the taste. I definitely got this tea served in Siberia, thinking it was ordinary chinese black tea. Nobody told me I was wrong. The taste is gentle and pleasant.
To make your own mongolian tea, collect leaves blackened over the winter. I have noticed that in cold winters it is good to wait until the beginning of March. In mild rainy winters, I find the taste best when collecting leaves earlier, sometime in January. The crucial for harvest time decision, is how far the natural fermentation has progressed. I look into the bed from time to time during winter.
When leaves are collected, I wash off dirt, chop and dried them. They easily dry on a tray indoors. Quality is not affected by a prolonged drying time, as are so many other products for drying.
 //embedr.flickr.com/assets/client-code.js
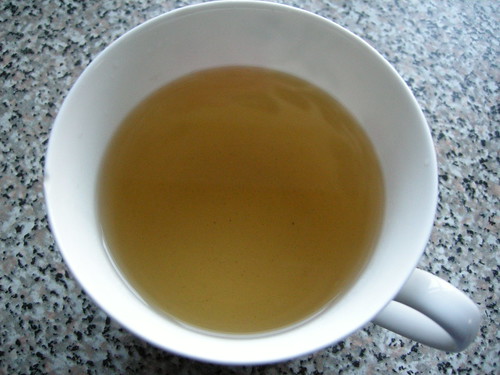
A nice cup of mongolian tea
The mongolian tea is infused like regular black tea. However, one might consider using more tea leaves than usual, to enrich taste and colour. You can infuse the same leaves two or three times, before the taste gets insipid.
Do you want to know more, please search on “Бадан толстолистный”, and translate with Google, babel fish, etc.
Eg. I found out:
When growing, expect to harvest 3-4.5 tonnes of dried leaves per. hectare. The leaves can be harvested from the third year after planting. The area can be harvested 8-10 years or longer.
The thick rhizomes are edible, after a thorough leaching – I found no recipe.
January 1, 2016
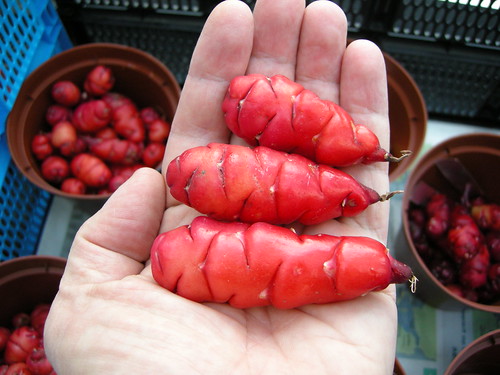
Oca, Oxalis tuberosa, from neglected tubers surviving in the ground during last winter
Oca are late to develop underground tubers. This mild start of winter has been a gift for the ocas. Harvested between christmas and new year, it is my best oca harvest ever.
The two clones that yielded best, I’ve grown for years. The neglected tubers survived last winter in ground. But I guess the better yield is due to better soil and more space.
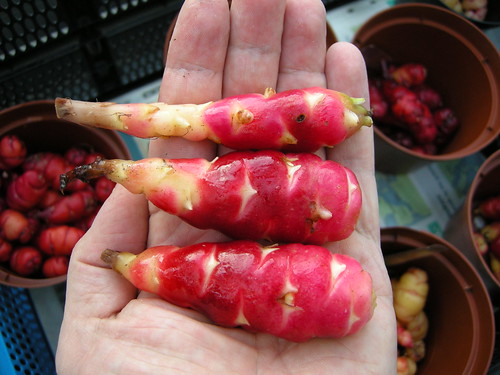
Oca, Oxalis tuberosa, from neglected tubers surviving in the ground during last winter
With a good harvest came the desire to use oca for food. They cured some days at room temperature, before being boiled in water until tender. The taste was pleasantly mild and slightly sour. I guess most people will like oca.
 //embedr.flickr.com/assets/client-code.js
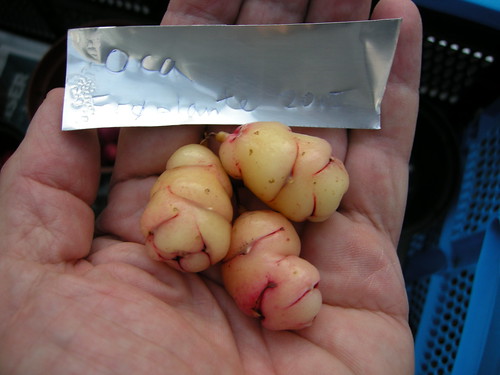
Oca from a first year seedling
In the spring, I was presented some new oca clones, and a small bag of the rare oca seeds. The seeds made it in to a single healthy oca plant, that produced these nice tubers. Many thanks to Philip Heinemeyer!
Oca is producing tubers in short days. Quite unfortunate in scandinavia! For more ease of culture, shortday dependecy need to be bred out of oca, like it was done in potatoes. To breed oca, I need seeds. Before seed harvest, ocas must flower. Unfortunately, also flowering seems to be shortday dependant. (*correction: Oca, I learn, can flower in long days) Anyway, I still wait for the first oca flowers in my garden. While waiting for the flowers, I really appreciate the efforts of gardeners in milder parts of Europe!
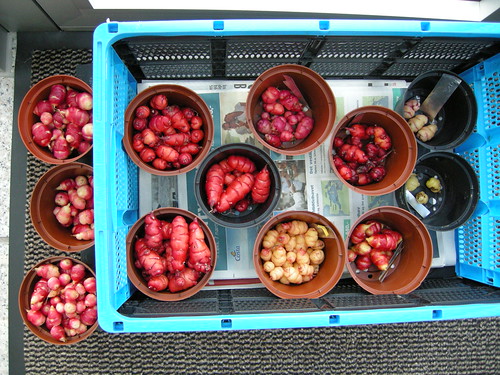
Entire oca harvest
The above photo show the entire oca harvest. The six pots on the right contain named clones and the seedling, the six pots on the left contain the two old clones.
Ps. I’ve saved some tubers of all the clones for next garden season.
April 18, 2015

Apios, Apios americana
A scientist asked if I could send him some old pea cultivars. He is interested in hardy crops that will adapt to climate change. I sent what I could get hold on to him. As thanks, he sent some clones of apios, and asked me to follow them some years and report back. When I reported back last year, he sent several more clones.
Now I’m learning to grow apios. First lessons included.
– If they dry too much on the surface, they go dormant. It can take a whole year for them to break the dormancy. Therefore, they must be kept slightly moist in plastic bags if they are to be sent by mail.
– They can withstand frost, far more than I expect in a harsh winter here.
– They develop edible tubers like huge pearls on a string, and the roots are very long. I have not yet dared to put them into the ground, but grow them in tubs. I was recommended 40ltr. (10,5 gallons, US) tubs as appropriate size, and it has worked fine. Had I carelessly put them in a row in the vegetable garden, I would now, two years later, not be able to keep track of the clones.
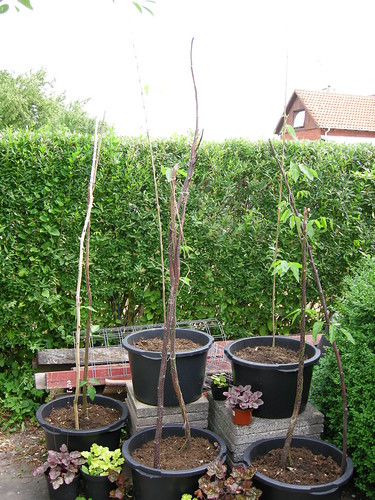
The set-up with 40 liter (10.5 US gallon) tubs
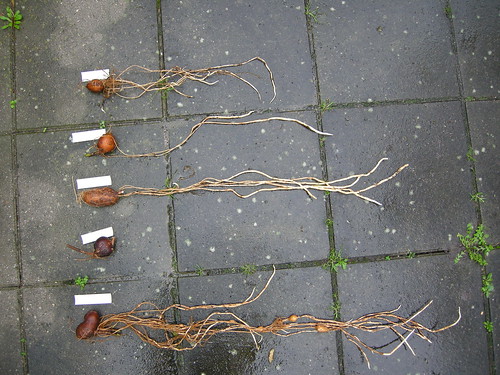
First year harvest didn’t impress.
I also learned that Apios are slow food. They must grow for several years before the harvest is reasonable. There’s something to improve, by selective breeding for more productive clones, and a few scientist work on this in USA.
I have yet to see them bloom. No flowers – no seeds – no chance to improve anything. Maybe if I sacrifice space in the greenhouse, I could harvest seeds and start breeding Apios.
For now I’m grateful being able to grow some.

Some of the clones increased surprisingly much in second season
Now I have taken interests in Apios, I have acquired a clone from a danish seed saver who have grown it for a decade I think. It derived from Chiltern Seeds originally. It is shown in the first image in this post. I feel I need it for comparison.
A few good qualities I just have to mention:
– Tubers of Apios contains as much protein as dry beans, and of same good quality.
– Apios can be harvested throughout the year, if frost doesn’t prevent digging in the ground.
There are several pictures of individual clones on my photo page on Flickr:
https://www.flickr.com/photos/10348212@N07/sets/72157651806087245/
PS. The scientist had my short report a few weeks ago. Quite banal, mainly a link to the photos I took (link above). In the text of the pictures I have inserted clone no. and weight, in case it is not clear enough on all photos. In response, he sent a new clone he thinks we can benefit from testing in Scandinvia.
November 2, 2014
Prinsesse NGB18186 and Blauhilde – the Grandchildren
Posted by skrubtudsen under bean, garden, plantbreeding | Tags: bean, plantbreeding |Leave a Comment
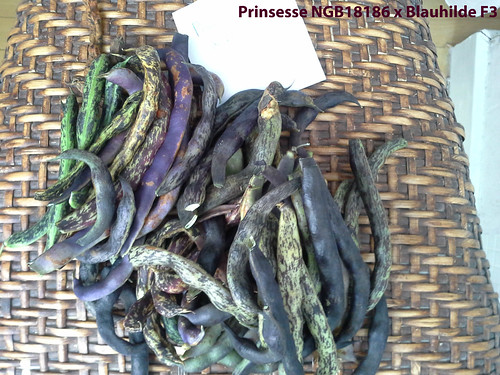
Pods of the last harvest. Phaseolus vulgaris Prinsesse NGB18186 x Blauhilde F2
The best bean cross this year was no doubt the accidental cross between Prinsesse NGB18186 og Blauhilde. It is the F2 generation I have grown, and the seeds harvested is F3. It is confusing for most people. This years F3 seeds will grow the F3 plants next year, to produce the F4 generation of seeds. A little, but for understanding these photos, important detail is, that the seed surface consist of tissue from the mother plant, thus showing us F2 fænotypes. The inside of the seeds with the embryo is F3 tissue. Keep your mind clear, or just enjoy the photos 🙂

F2 generation with a wonderful diversity
Pod shape and colour show a great diversity in this F2 generation. In next generation even more diversity may show, as genes recombine. Some of the beans er quite long. Others are curved and charming, in a way usually selected against in breeding programs. Straight pods are preferred by consumers. As a gardener, I have to find out, if I really share this view on pod shape. I’ve read about german “posthörnchen”, strongly curved wax beans, reminding of old days posthorns.
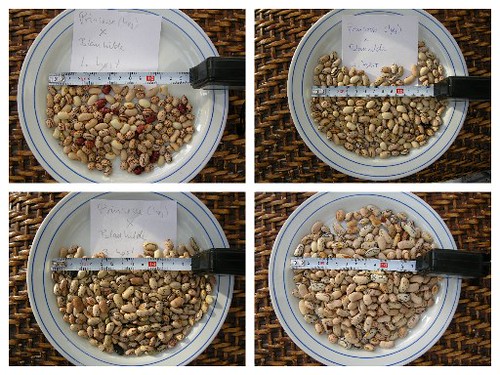
F3 bean seeds, skin is F2 tissue
Each photo in the above mosaic show the seeds from a harvest event. In the first harvest are only seeds from the early maturing individuals. In following harvest events the same individuals probably also released pods. To me the first harvest is the most important, as cold climate is a limiting factor in beans in my garden.
A few seeds are very dark. One pod in the first harvest, and one in a later harvest. The same plant must have set more pods, with a different colour. This is all normal, as patterned beans tend to make an occasional “negative”.
July 28, 2014
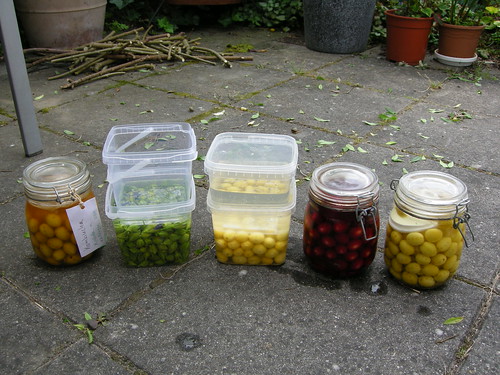
Fermented Cherry Plums
Posted by skrubtudsen under flowers, fruit, harvest | Tags: "Hibiscus syriacus", "Prunus ceracifera", fermentation, hibiscus, prunus |[4] Comments
Attribution-Noncommercial-Share Alike-Some rights reserved
For some years, I have wild fermented unripe cherry plums, and been utmost satisfied with the result. This year, I repeat the process, now with some variations. I try to put some raw beetroot pieces into one of the glasses for red-coloured plums ferment. I put French tarragon in two glasses, one of which is fermented in kombucha.
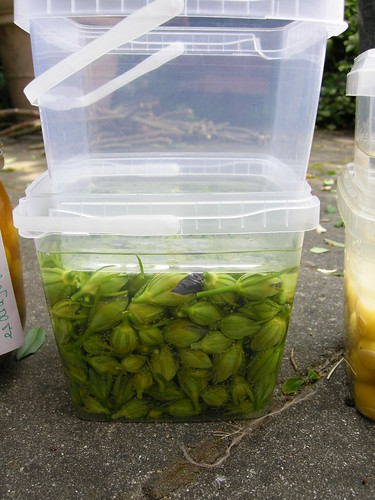
Since I had to cut my Syrian rose slightly, I searched for it on the web and found, that it is edible. The buds are about the size of cherry plums, leading me to wild ferment a batch of them. Never read about anyone fermenting Syrian rose, could be wonderful.

Attribution-Noncommercial-Share Alike-Some rights reserved
My recipe for success:
Lactic acid fermentation. Prick the Cherry plums with a fork. Add herbs or beet pieces and cover it all in a cold 5% saline brine. Now, keep it a warm room temperature to start the wild fermentation. Let it bubble happy for a week or two, then relocate to a cool pantry. Fermentation develops gases that have to escape. In glasses release the lid shortly on a daily base (at longer intervals, when little gas is released). When I use plastic boxes (food grade), I use an extra box as lid an weight. It works very well, keeping the Cherry plums (or other ferments) neatly under the fluid, leaving a narrow space where gasses can escape. The bubbles seems to make enough turmoil to prevent mould from growing in the first most microbial active weeks. When I transfer them to a glass later, I can pack cherry plums closer, it saves space. And I don’t have to release the lid so many times.

Attribution-Noncommercial-Share Alike-Some rights reserved

Attribution-Noncommercial-Share Alike-Some rights reserved
Fermenting in kombucha will probably be shorter than the lactic ferments. As I close the lid, only releasing pressure once a day there will be little oxygen available. I expect the kombucha culture to only develop a little under these conditions, enough to make a thin SCOBY on top, as a kind of interior lid. This may cause, a secondary fermentation, either alcoholic or lactic. The first time I saw a secondary wild fermentation, I was a little frightened. It was the spring shoots of Hosta. But the result was good and mild tasting. Now I have to wait and see how the plums in kombucha develops.
Attribution-Noncommercial-Share Alike-Some rights reserved
When wild fermenting flower buds of Syrian rose, I decided to use the box method. From the taste of the raw flower buds, I guess they are very nutritious. All this nutrients can feed a powerful fermentation, with lots of gasses, a stormy fermentation. With the box-method no gasses will build up, but are continuous released.
Now my patience is put to test – I want to taste, but must wait.
April 21, 2014
Food Workshop
Posted by skrubtudsen under harvest, heirloom, herbs, jerusalem artichoke, pea, pepper, recipe, seedgeek, the world around, wild plants | Tags: "food workshop", fermentation, herbs, kombucha |[2] Comments
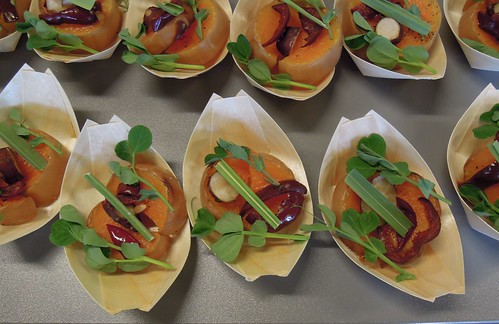
Baked pumpkin with Jerusalem artichoke, pepper, pee shoots and lemongrass
© Randi and Svend Sørensen
Food workshop – Samples and recipes with Danish Seed Savers own varieties. Part of Danish Seed Savers spring course, medio March.
Early in the winter I was asked to do a food workshop in March. Almost all crops was harvested and eaten by then. It was too late to sow new crops. Or so I thought. It turned out that I had time to cultivate pea shoots. And winter was mild, so there were left over small turnips in the garden, though the best was eaten. And while the focus was on seed saver cultivars, wild plants could also be included. And some fellow seed savers offered some of their crops for the day. So even in mid-March it was possible to present a wide range of flavours and cooking methods.
The samples was organised in stations. Clever women helped me set up the stations early in the morning. Each station should present a little harmony, but the order of stations should also guide taste buds through a landscape of sour, salty, bitter, umami and sweet. I had used very little spices, at the cultivars taste should be brought out. I had no intentions, that participants will copy this at home, but I hope the will feel empowered to explore old cultivars and wild edibles at home. Delicious cultivars are easy to preserve for future. Cultivars you don’t like to eat tend to be a pain to keep in culture. But often the difference is in the preparation.
The little old Errindlev pea was only four seeds from extinction. It was presented to the seed savers as an almost inedible, but old cultivar. I had been grown by an old woman in a village. She presented the seeds to younger people, but somehow her knowledge on the cultivar didn’t follow the seeds. Indeed, eaten as a green pea, it is no pleasure at all. But as a snow-pea and as a dry grey pea it is gourmet food. It almost became extinct before proper uses was discovered. Hereafter I listen more carefully to old people when they hand over their unique cultivars.

Salad of dandelion and turnip
©Randi og Svend Sørensen
Station 1
Salad of dandelion root and leaves, turnip and ramsons, with a pine oil and verjuice dressing
My thought was that it’s good to start with a salad. I have experience with this combination, where dandelion sweetness, nuttyness and bitterness plays well against the turnips sweetness and kale flavour. Ramsons provides an experience in a completely different level and an opportunity to bring your mind off the dandelion bitterness. The salad sets the stage for subsequent stations.
Dandelion: Weed from my own garden, cleaned and cut into suitable pieces. The flavor is both bitter, sweet and nutty.
Turnip: Petrowsky Gulia, Ohlsens Enke strain, Vangede 1948. Originally I got the seeds from the NordGen genebank, has now grown it for two generations. A nice yellow turnip. In autumn, the peel is pretty sharp tasting, like radish. To my surprise, here in March, it’s quite mild and there is no reason to tear off the peel.
Ramsons: Picked in the nearest wood a few years ago, sliced, fermented and stored in sealed glass in the refrigerator. Appearance, aroma and texture quite like freshly fermented ramsons. A strong aroma could be felt throughout the room, although there were only used very small amounts. When it comes to ramsons, fermentation intensifies and improves the garlic-like aroma. It does not take more than 5-10 minutes to pick what I use in a year. Ramsons has a fairly long picking period in April and May. Be sure to identify it properly, as some people get poisoned from mistakenly eating Lily of the Valley or Colchicum.
Oil: Siberian pine nut oil. An oil with a slight hint of resin. Many know the resin taste of Greek retsina wine.
Verjuice: The juice of unripe Rondo grapes from my own garden. To increase shelf life, I vinegar fermented the verjuice with kombucha / vinegar culture. In this way it contains both tartaric acid and acetic acid formed by fermentation and the acidic profile of the salad becomes more balanced. Wine variety Rondo sets far more grapes than it can mature. I have to thin out in the grapes anyway, and then it’s wonderful to use it for a gourmet product like verjuice.
Chopped cabbage with eggplant, oca leaves and victory onion
©Randi og Svend Sørensen
Station 2
Chopped cabbage with eggplant, oca leaves and victory onion
Danish use of raw cabbage has shocked all Russians I know. That we eat chopped white cabbage, without doing more of it, is totally hardcore for a Russian. They will either squeeze it with a little salt, or ferment it. At this station, we taste the Danish version, to remember it when we later taste the other versions. To balance the raw cabbage, I add acid in various forms: fermented eggplant, oca leaves with oxalic acid and the sour cream with victory onion. It is reminiscent of wild ramsons, and yet, not quite?
Cabbage: Purchased organic import from the Netherlands. The chopped cabbage is a standard winter salad in Denmark. It is included here for comparison of chopped white cabbage in later stations where it is respectively squeezed and fermented.
Eggplant: Grown outdoor in my own garden. Lactic acid fermented with garlic topsets (forgot the variety) and mild chilli, Medina. It is unusual to eat eggplant raw, but it’s fine when it is fermented – it can save a lot of CO2 :-). Fermentation seems like a long marinating, creating its own acidity and allowing flavour of garlic and mild chilli to penetrate the eggplants completely. If you have cold storage, either in a cold pantry or refrigerator, the various pickled vegetables are easy fast food, letting you balance a meal in a hurry.
Oca: I put my oca tubers for sprouting weeks before, to garnish with the fresh acid tasting clover like leaves. As oca is daylength sensitive, is almost impossible to grow big oca tubers in Denmark, but easy to make many small tubers. They store well in a paper bag at room temperature, and can be set to sprout fresh and neat leaves.
Victory onion: Brought from Irkutsk in Siberia. Victory onion, Allium victorialis, is a relative of ramsons. It is harvested from wild populations in the Siberian taiga, fermented and sold in marketplaces. In sour cream (smetana) it acts as a sauce or dip. Have as salted ramson potent aroma, slightly different, but clearly related. In my garden it grows at a slow pace like peonies. It is highly ornamental, a true perennial edimental.
Cider
©Randi og Svend Sørensen
Station 3
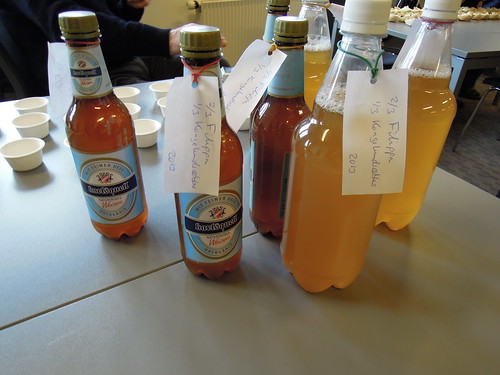
Cider from Filippa apples and seedling apples from the local wood
Time for a little drink to clean the mouth and refresh the taste buds.
Filippa: Fallen apples from my garden fermented into cider. The delicate Filippa taste is evidently in the cider
Apples from seed grown trees: Several places in the local wood are growing apple trees obviously grown from seed. Every one of them are unique. None of them are juicy like Filippa. I have the impression, that they didn’t really do anything for the cider, just being bulk. No problem, as I needed some apple juice to fill the fermentation tank.
The cider was started with a bottle of home made cider, to get fermentation started quickly. When the fermentation was ended, I bottled the cider with a little sugar to a get a light secondary fermentation. This carbonates the cider.
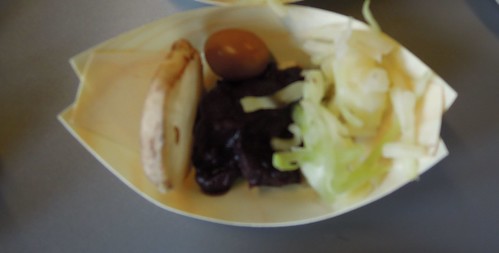
Grey peas, cabbage, cherry plums and Jerusalem artichoke
©Randi og Svend Sørensen
Station 4
Cooked grey peas, with squeezed white cabbage, fermented cherry plum and Urodny Jerusalem artichoke
Danish Seed Savers doing an EU founded project on rediscovering old peas and beans these years, calls for the use of grey peas. They need some crunch and acid from other elements for contrast.
Gray pea Lollandske rosiner: Old type of field peas grown by some seed savers. Soaked overnight with a teaspoon baking soda in the water. Then boiled two hours in fresh water with ½ teaspoon of baking soda. Since both yellow and grey peas are best second day, they were boiled up again and only this time I added a little salt. The peas do not disintegrate, but look like raisins in its own brown gravy. The taste is wonderful, although it is a very simple and inexpensive dish. Indeed, it’s also a healthy dish.
Squeezed white cabbage: Same cabbage, cut at the same setting on the mandoline. In this version sprinkled with a little salt and squeezed in a bowl. It takes approx. ½ hour, but you do not squeeze the cabbage continuously. Start squeezing it thoroughly for 2-3 minutes so that the cell walls burst. This releases enzymes, which starts a process that cures the cabbage to a gentle salat, even easier to digest. With 5-10 minutes intervals squeeze it again, and gradually it gets very juicy. The finished squeezed cabbage keeps for a week in the fridge. Make a big portion, and have fast healthy salad rest of the week.
Fermented cherry plums: Personally, I have had a slightly strained relationship with cherry plums. My mother was young during World War II. It taught her not to distinguish between plums and cherry plums. My childhood was therefore filled with cherry plums prepared by plum recipes, and it is not always successful. But a cherry plum tree in my garden has challenged me, and when I started fermenting cherry plums, it changed my view on cherry plums. When ripe and sweet, the fermentation will be alcoholic, due to the sugar content. This can probably become something wonderful too. But I pick cherry plums when they are still green but starting to turn yellow, and the sugar content still low. I wash them quickly in cold water, prick them with a fork, cover them in cold water with 5% salt and weigh them under the liquid surface with a plate. Then I store them at room temperature, to kick start the fermentation. After one to two weeks fermentation, I relocate them to a cooler setting (in the bottom of my pantry). Immediately before eating them, I soak them well in water to remove some of the salt. When young they taste very fresh and tangy, you can feel the carbon dioxide bubbles on the tongue. Later, after Christmas, the almond flavour of the kernels become more obvious, giving more depth to the flavour.
Jerusalem artichoke Urodny: This variety of Jerusalem artichoke is at the top in taste tests. And it is a clone everybody like, if they like Jerusalem artichokes at all. Here served sliced raw.
Baked pumpkin with Jerusalem artichoke, pepper, pea shoots and lemon-grass
©Randi og Svend Sørensen
Station 5
Baked Trombo d’Albenga musk pumpkin with Dwarf Jerusalem artichoke, green pepper, Errindlev and Engelsk Sabel ESA pea shoots and lemon-grass
Baked pumpkin is soft mild carbohydrates. They must be pepped up and meet contrasts. Here in the form of crunchy Jerusalem artichoke and sour peppers. We will discover, if we like this Jerusalem artichoke, and compare it with the taste of Urodny from an earlier station. Do we experience a difference between the two varieties of pea shoots. We will experience the taste of vinegar fermented pepper.
Trombo d’Albenga musk pumpkin: Musk Pumpkin is heat-lover, and need a good summer to succeed. This northern Italian cultivar does seem to be among the best adapted. It can be used both as a summer squash and winter pumpkins. Here I cut the long massive neck in slices and baked them in the oven, with a little salt and pepper. All pumpkins (and cucumbers) is high in potassium. This can be balanced with the sodium of salt.
Dwarf Jerusalem artichoke: Served sliced raw. This clone divide people. Either you think it’s the world’s best Jerusalem artichoke or the worst of all! In taste tests, no one find it to be in the middle. Taste it before you grow it. The flavour is intense nutty with dark mineral tones.
Acetic fermented outdoor peppers: Green peppers are really good sliced and put in kombucha with spices and stored in the refrigerator. Here they were spiced with garlic topsets, a little mild chilli Medina, and a little verjuice. Kombucha should not be too young, but have developed a good acidity. In my kitchen, this corresponds to at least 2 weeks fermentation. You can also use kombucha fermented apple juice (apple vinegar). Acetic fermentation in this style differ from traditional pickling in that the acetic culture is alive. I find the method good for vegetables that will not fare well in a lactic fermentation. Typically dark green vegetables. Some will surely love lactic fermented green pepper, I just do not. In contrast, the red pepper is irresistible when lactic fermented.
In this method, the kombucha or vinegar is fermented already, allowing you to use herbs that would otherwise inhibit fermentation.
Errindlev pea: The peas were put to germinate about 14 days before, mostly in the greenhouse, but inside during cold periods. Shoots were served raw. They can also be used on top of a soup, in salads or in a wok. This variety is actually a grey pea, ie. a dry pea. But it works great as snow pea and pea shoots.
Engelsk Sabel ESA: Same treatment and serving as Errindlev pea. This variety is a tall snow pea, a strain developed by Ohlsens Enke, and preserved in Nordgen.
Lemon-grass: A piece of fresh leaf on top, to give a little fresh lemon aroma. People do not eat lemon grass, but chew on it, to enjoy the taste. This clone I once brought home from Thailand. In the summer, put it out in the kitchen garden, in winter, taken in to the house. This clone provides large lemon-grass stalks. When drying lemon-grass flavour is well preserved, as opposed to lemon balm, which lose flavour in drying.
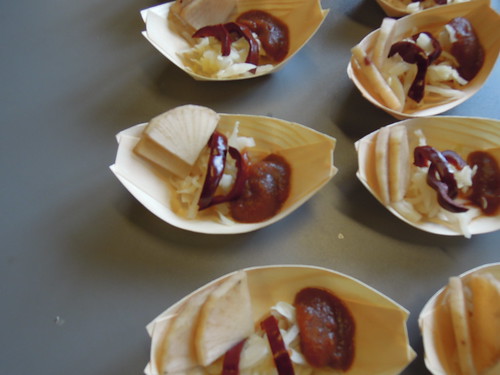
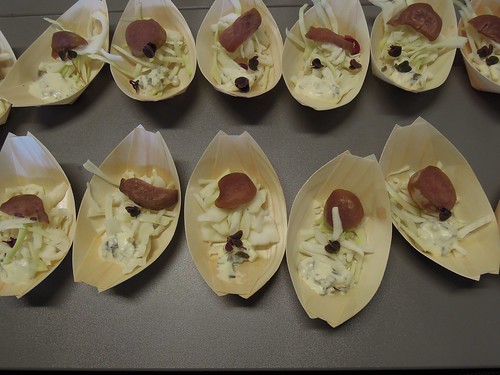
Fermented cabbage with yacon, hawthorn ketchup and red pepper
©Randi og Svend Sørensen
Station 6
Fermented cabbage with yacon, hawthorn ketchup and red pepper
Here we come to the last cabbage, which is lactic fermented. As a German sauerkraut, without caraway, only slightly fermented, and still alive. We shall try yacon, which many have not yet tasted. In the wild end we taste the hawthorn ketchup. We also see the difference from the fermented vinegar peppers in the station before and this stations lactic fermented red pepper.
Fermented cabbage: Same cabbage and cut at the same setting on mandolin, as the chopped and squeezed cabbage from previous stations. This cabbage was treated like squeezed cabbage, and then immediately pressed into a glass, so the juice covered the cabbage. Close the lid and let ferment for one to two weeks. Every day unscrew and re-screw the lid, to relieve the pressure. It also gives a good feel for the fermentation progress. When you are satisfied with the result, store the fermented cabbage cool. The refrigerator keeps it fresh for a very long time, at higher temperatures the fermentation continues, depending on temperature. But there is plenty of time to use the fermented cabbage, even at not so cold temperatures. The fermentation can be varied endlessly with other vegetables, appropriate condiments and different slicing techniques. For those who do not eat fermented milk products, fermented vegetables provides the beneficial bacteria in your diet.
Yacon Morado: Grown by Kirsten Hedegaard.
Yacon is still a new vegetable in Denmark. Nutritionally, it resembles Jerusalem artichoke, but in terms of taste, one might call it the watermelon of root vegetables. Served raw, as here, it is sweet, juicy and crisp. Used in baked root vegetables it keeps its crispness quite a while before it finally starts to get soft. This variety is Morado, which has proven to be easy to grow in Denmark. It is grown almost as Dahlia. It is frost sensitive, so the tubers should be stored frost-free. They last well into spring by proper storage, and can thus still be used when Jerusalem artichoke season ends.
Hawthorn Ketchup: Hawthorn ketchup for today was made with few spices to give a clearer impression of hawthorn berry taste. It is my experience that you have to taste the berries before you pick them. Pick from the bushes with best tasting berries.
Red open ground pepper: This is breeding material, that in a few more generations can become a new pepper cultivar. I grow it in the open air in each generation to make sure it will be a tough line. These ripe red peppers I have lactic fermented. Lactic fermentation brings out the best in mature red pepper (and maybe the worst in green?). I added garlic and verjuice to intensify the flavor. Verjuice make the pepper taste even more of pepper.
Station 7
Kombcha, ground ivy, Daubenton kale and Bergenia
Sorry, no photo. Again a little fluid on the palate. This time in the form of kombucha. For the brave, there is a version infused with fresh ground ivy. When you taste something unknown, it can feel reassuring holding something well known in the other hand. For this purpose I served some freshly cut Daubenton kale. The adventurer may also try a Bergenia tea.
Kombucha: Acetic fermented sweetened black tea. For this sample fermented five days, to preserve some of the sweetness. For other uses I ferment it two to four weeks.
Ground Ivy: A lovely spring flower and herb. I pluck it, and let it rest in kombucha some hours before filtering. Then, it can last a long time in a bottle in the refrigerator.
General considerations about kombucha and herbs: Many herbs can slow or change the kombucha fermentation. To prevent this I suggest you first do your kombucha, prepare a new batch, and only then infuse your herbs in kombucha. In this way, your mother culture is never exposed to the herbs antibiotic substances.
Daubenton kale: Small stemshoots served as a snack for kombucha. They were all eaten with eager, except what people took home as cuttings. This summer, there must be many small cabbages in many a seed saver garden derrived from this food workshop 🙂
Daubenton kale is a leafy brassica that never blooms, and therefore do not produce seeds. The are longlived, but can die off in cold winters. After a mild winter like this year, it is fantastic, filled with tiny tasty leaf shoots, which can either be eaten or used for cuttings.
Bergenia cordifolia: This plant I brought as tea leaves from my garden, and a Thermos of the fresh tea. Again I was surprised by the willingness to taste. In Siberia and Mongolia, it is not unusual to drink Bergenia tea. I recognize the taste. I was served this tea on several occasions in Siberia, without being told that this was different from not black tea. A mild black tea appearence, gentle flavour. You harvest this tea by picking the blackened leaves in february or march. Then the bitterness has leached out in winters rain. I washed the leaves in the kitchen sink before I wiped them dry and hanged for completely drying before storing.

“Cabello de ángel” and garlic cookies
©Randi og Svend Sørensen
Station 8
“Cabello de ángel” and garlic cookies
The end is near, and many wish some real sweet in the mouth now. A reward of jam on bread, which is probably not challenging, and the more challenging cookies with garlic.
“Cabello de ángel”: This was served on a small piece of bread. The jam was made from a Siam seven year melon (Cucurbita ficifolia) by Kirsten Hedegaard, who also grew it in her garden. Siam is a very durable pumpkin that easily holds 1-2 years at room temperature, or maybe even 7 years, as the english name suggest? The flesh is white and stringy, black seeds. The flesh is also used in modern shark fin soup, saving the endangered sharks of the oceans. The seeds are also very tasty. I prefer them to C.pepo seeds.
Garlic Cookie: Oatmeal cookies baked with almonds, garlic and a little salt. There are several kinds of pastries with garlic that has been presented at our danish garlic competitions. It seems that to be good in pastries, the garlic must either be combined with chocolate or salt. Garlic in the sweet kitchen challenge our cultural concept of sweet and onion, but can easily be successful for those who are willing to accept the challenge
Station 9
Green and full ripe fennel seeds
Last station must open our eyes to the importance of harvest timing. And it must be the ending point for all previous stations. Inspiration comes from India, where I often got a little nip of anise seeds, when paing for a meal in a restaurant.
Fennel: At the end of the taste tests were two kinds of fennel seeds. Fully ripe seeds, which are also suitable for sowing. These seeds were harvested 2013. The second kind were harvested green in 2010. It was interesting that although both types taste of fennel, the green harvested, although old, had a finer and stronger flavour. The seeds were harvested in my garden, where I grow fennel as perennials
A big thanks to the talented women who helped me organize this workshop.
December 25, 2013
Progress in Eggplant Breeding
Posted by skrubtudsen under eggplant, harvest, plantbreeding, seed, winter | Tags: eggplant, harvest, plantbreeding, seed, solanum, Solanum melongena |[13] Comments
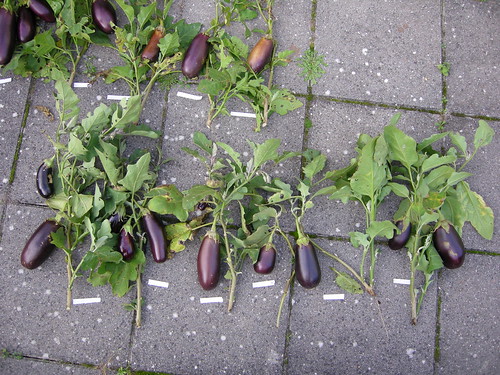
Eggplant breeding line 1 F4 (top row is part of breeding line 3)
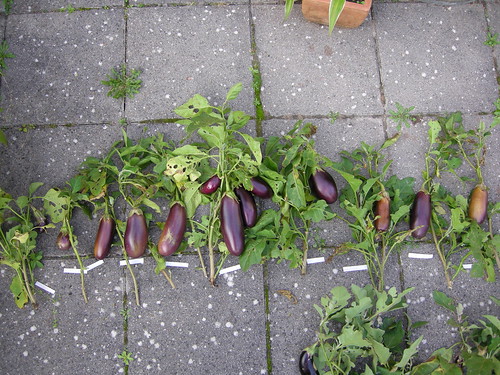
Eggplant breeding line 3 F3
The photo above shows the harvest of eggplants from the open ground bed in the vegetable garden. The plants of breeding line 1 is grown out of seeds from 2012 harvested in the greenhouse. Therefore, this line is a generation ahead of processing line 3, which is grown out of seeds grown in the open ground in 2009. Since 2009, I harvested lots of eggplants in the open ground, but there has been no obvious progress in my plant breeding, no new generations. Until last year that is, when I put some plants of breeding line 1 in the greenhouse, and got a new generation, but without knowing anything about their outdoor values. I have spent the years since 2009 to determine which envelopes of the 2009 seed harvest do most frequently provide better plants. It is valuable, although it does not produce new generations, because it allows me to concentrate on growing more individuals from the best seed envelopes.

Seeds from a single outdoor grown eggplant fruit
Never have I harvested so many eggplant seeds. Almost all mature eggplants contained seeds, and some of them contained more seeds than I’ll be able to grow before they get too old. The seeds appears to be of prime quality. An eggplant seed celebration!
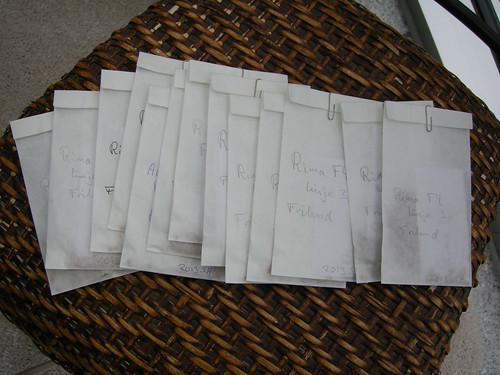
Envelopes with eggplant seeds from open ground
This many seeds promise a lot of labour to find the best seed envelopes to draw future generations from. Which of them will produce the most reliable plants for growing outdoor in my kitchengarden?
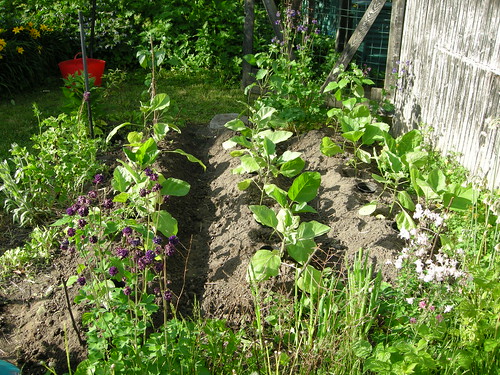
The eggplant bed shortly after transplanting in June
The newly transplanted eggplant bed looked neat Later weed germinated in this fertile, well-watered bed, mostly dandelions, kale and sonchus, all edible, delicious and providing a long lasting harvest. I still harvest kale and dandelion. Easy and gentle multicropping.
Since I harvested way too many seeds for my own use, I will share with interested gardeners.
In Denmark through the danish seed savers: Frøsamlerne
Other nationalities please contact me either by leaving a comment, or PM me if you know me in some of the social networks like HomegrownGoodness or facebook.
December 22, 2013
Late December Harvest
Posted by skrubtudsen under harvest, heirloom, turnip, wild plants | Tags: dandelion, harvest, turnip, winter |1 Comment
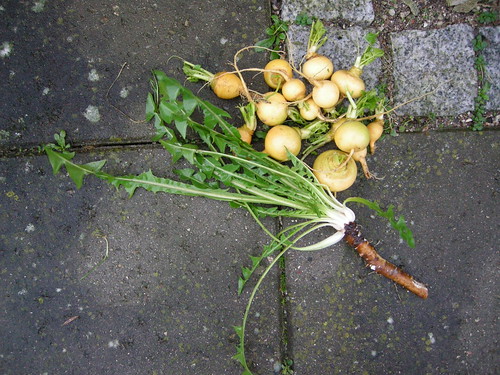
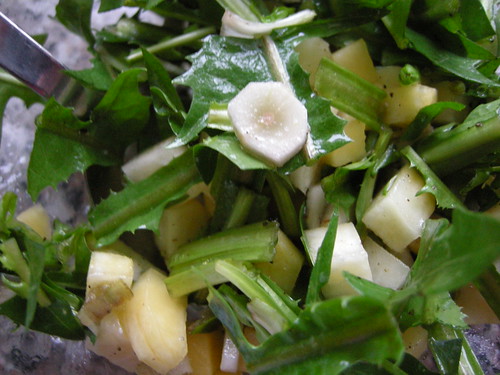
Dandelion and Petrowsky turnip fresh from the garden
There is always something to harvest in the garden,as long as the ground isn’t frozen. This time it’s the dandelion and turnips. They made a lovely salad, with a little salt, pepper, olive oil and vinegar.
 The fresh December salad
When I was younger I could hardly eat dandelion, and only leaves in early spring. My taste have changed, and I am less fond of sweets, and more fond of the bitterness. This summer I discovered that green dandelion leaves picked in mid-July has a nice bitter and nutty flavour. Here in December dandelions taste almost sweet and nutty. The sweet taste has a different and more satisfying character than traditional sugar sweet. The bitter taste satisfies, as can be experienced if you eat traditional dark chocolate (please note that the big companies are starting to make dark chocolate that does not seem to get one to stop eating naturally. Good for their bank account – bad for customers’ BMI)
The root has a similar wonderful flavour. I peel it and slice it thinly.
Dandelion is the ultimate easiest grown vegetable I can think of.
No sowing, it is self sown (weedy).
No weeding, remember, it’s a weed.
No watering, It’s weedy and hard to kill.
Only work involved is reaching to the ground for the harvest.
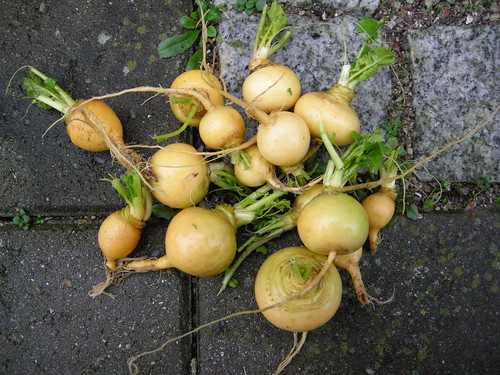
Turnip Brassica rapa Petrowsky Gulia
The turnips are among the last of the ones I sowed after harvesting the garlics. The most typical, I moved to a bed where they next summer will flower and set seeds. The other large turnips we have eaten during the autumn. Left are the smaller ones, which still grows in the mild December weather we have at the moment.
If we want a spicy taste, we eat them raw with the skin on. For a mild turnip, we draw the skin off with a knife. One of the secrets of turnips 🙂
Petrowsky Gulia is an old Danish strain of an Eastern European cultivar, as I have written about in a previous post:
https://toads.wordpress.com/2010/01/01/seeds-from-nordgen/


